Get Started with ImagineCreate AI
New to ImagineCreate? Follow this quick guide to uploading your first product image and generating AI photoshoots/videos without renting a studio or hiring models.
Your Guide to ImagineCreate's AI
Photoshoot & Video suite:
Step 1: Choose Your Photoshoot Type
Sign in to imaginecreate.ai and on the dashboard, choose the kind of photoshoot you want to do.
You can pick from:
Fashion (Apparel such as dresses, pants, and outerwear)
Jewelry (Earrings, necklaces, and earrings)
Accessories (Bags, hats, and sunglasses)
Product (Packaged goods such as skincare, beverages, and electronics)
Step 2: Upload Your Product
For this guide, we’ll choose Fashion.
On the top sidebar, click Upload New Product.
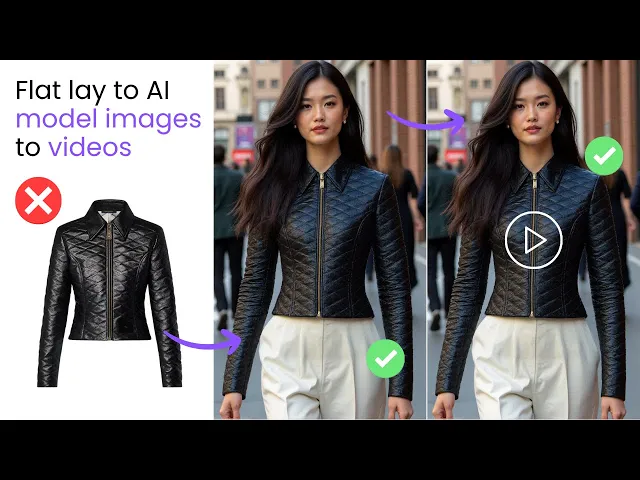
Upload one flat lay photo of your garment — that’s all you need.
Tip: Upload a clear, well-lit image with the garment centered and fully visible. White or transparent backgrounds work best. If uploading an on-model image, make sure to crop the model’s face so the AI can focus on the clothing.
Step 3: Select Generations
Next, select the number of generations you want to create.
The default is 2 generations and each image uses 2 credits.
You can choose between 1 and 4 images to generate.
Step 4: Write Your Prompt
In the prompt box describe:
The model you want to see your garment on
The setting you want the photoshoot to take place
For example: Top on brunette model in New York
Once you’re done, click Generate Image. In under 2 minutes, you’ll see all your generations appear.
Step 5: Review and Download
All your generated images are automatically saved in your Portfolio, so you never lose your work.
You can download any photo instantly — and every AI image you generate is completely yours to use. No licensing fees, no watermarks, just ready-to-use visuals for your store or campaigns.
Step 6: Turn Your AI Photoshoots into Videos
You can transform any generated image into a 5s video by simply:
Selecting the image you want to animate.
Changing your prompt to describe movement.
For example: Model walking in New York, camera panning backwards
Once you’re done, click Generate Video. In under 2 minutes, you’ll see your video.
Step 1: Choose Your Photoshoot Type
Sign in to imaginecreate.ai and on the dashboard, choose the kind of photoshoot you want to do.
You can pick from:
Fashion (Apparel such as dresses, pants, and outerwear)
Jewelry (Earrings, necklaces, and earrings)
Accessories (Bags, hats, and sunglasses)
Product (Packaged goods such as skincare, beverages, and electronics)
Step 2: Upload Your Product
For this guide, we’ll choose Fashion.
On the top sidebar, click Upload New Product.
Upload one flat lay photo of your garment — that’s all you need.
Tip: Upload a clear, well-lit image with the garment centered and fully visible. White or transparent backgrounds work best. If uploading an on-model image, make sure to crop the model’s face so the AI can focus on the clothing.
Step 3: Select Generations
Next, select the number of generations you want to create.
The default is 2 generations and each image uses 2 credits.
You can choose between 1 and 4 images to generate.
Step 4: Write Your Prompt
In the prompt box describe:
The model you want to see your garment on
The setting you want the photoshoot to take place
For example: Top on brunette model in New York
Once you’re done, click Generate Image. In under 2 minutes, you’ll see all your generations appear.
Step 5: Review and Download
All your generated images are automatically saved in your Portfolio, so you never lose your work.
You can download any photo instantly — and every AI image you generate is completely yours to use. No licensing fees, no watermarks, just ready-to-use visuals for your store or campaigns.
Step 6: Turn Your AI Photoshoots into Videos
You can transform any generated image into a 5s video by simply:
Selecting the image you want to animate.
Changing your prompt to describe movement.
For example: Model walking in New York, camera panning backwards
Once you’re done, click Generate Video. In under 2 minutes, you’ll see your video.

Copyright © 2025 Fytech Corp. All rights reserved
Copyright © 2025 Fytech Corp. All rights reserved
Copyright © 2025 Fytech Corp. All rights reserved